
Retaining wall maintenance guide 2026: 25% longer lifespan
- pkgbp02
- Mar 4
- 9 min read

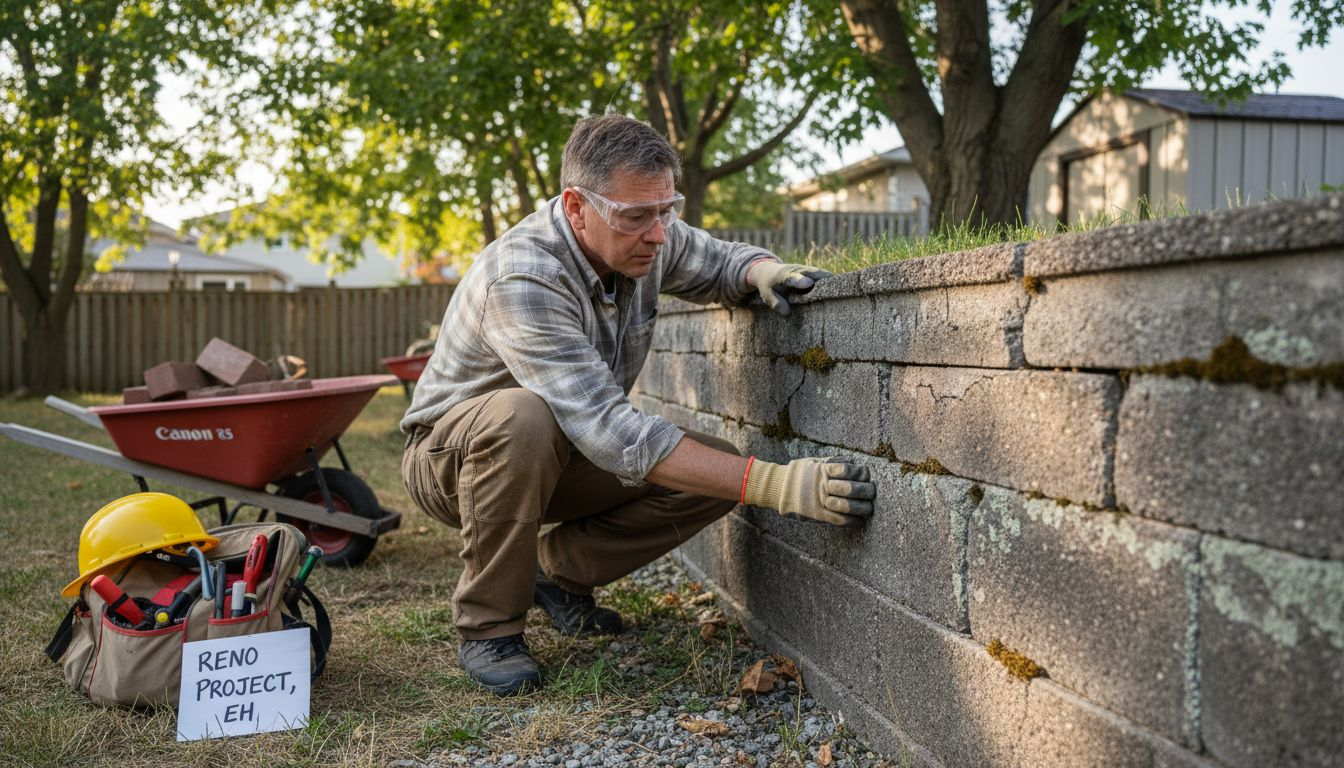
After a harsh Toronto winter, many homeowners notice unsettling changes in their retaining walls: small cracks spreading along joints, subtle bulges pushing outward, or walls leaning at odd angles. These aren’t just cosmetic issues. Regular inspection of retaining walls every 6 months reduces risk of structural failure significantly, turning potential disasters into manageable fixes. This guide walks you through step-by-step maintenance tailored specifically for Toronto homeowners, helping you preserve both the beauty and durability of your outdoor investment.
Table of Contents
Key takeaways
Point | Details |
Inspect twice yearly | Catch early damage signs before they escalate into costly structural failures. |
Maintain drainage systems | Prevent hydrostatic pressure and erosion that compromise wall integrity. |
Clean walls annually | Remove debris and control invasive vegetation without damaging mortar joints. |
Apply sealants before winter | Protect against freeze-thaw cycles that accelerate material degradation. |
Avoid common mistakes | Skip high-pressure washing and address small cracks immediately to prevent major damage. |
Prerequisites: what you need before starting retaining wall maintenance
Before you tackle maintenance tasks, gather the right tools and understand what you’re working with. This preparation saves time and prevents accidental damage.
Essential tools and materials:
Inspection tools: flashlight, tape measure, level, camera for documentation
Cleaning supplies: soft-bristle brushes, buckets, mild detergent
Safety gear: work gloves, safety glasses, dust mask
Repair materials: polymeric sand, approved sealants, geotextile fabric
Drainage tools: garden hose, wire brush for clearing pipes
Safety equipment matters. Protect your hands from rough surfaces and your eyes from debris. Even routine maintenance can expose you to sharp edges or cleaning chemicals.
Knowledge of retaining wall materials and seasonal timing is essential for safe and effective maintenance. Toronto’s climate presents unique challenges. Our freeze-thaw cycles stress walls differently than milder regions, making spring and fall the ideal inspection windows.
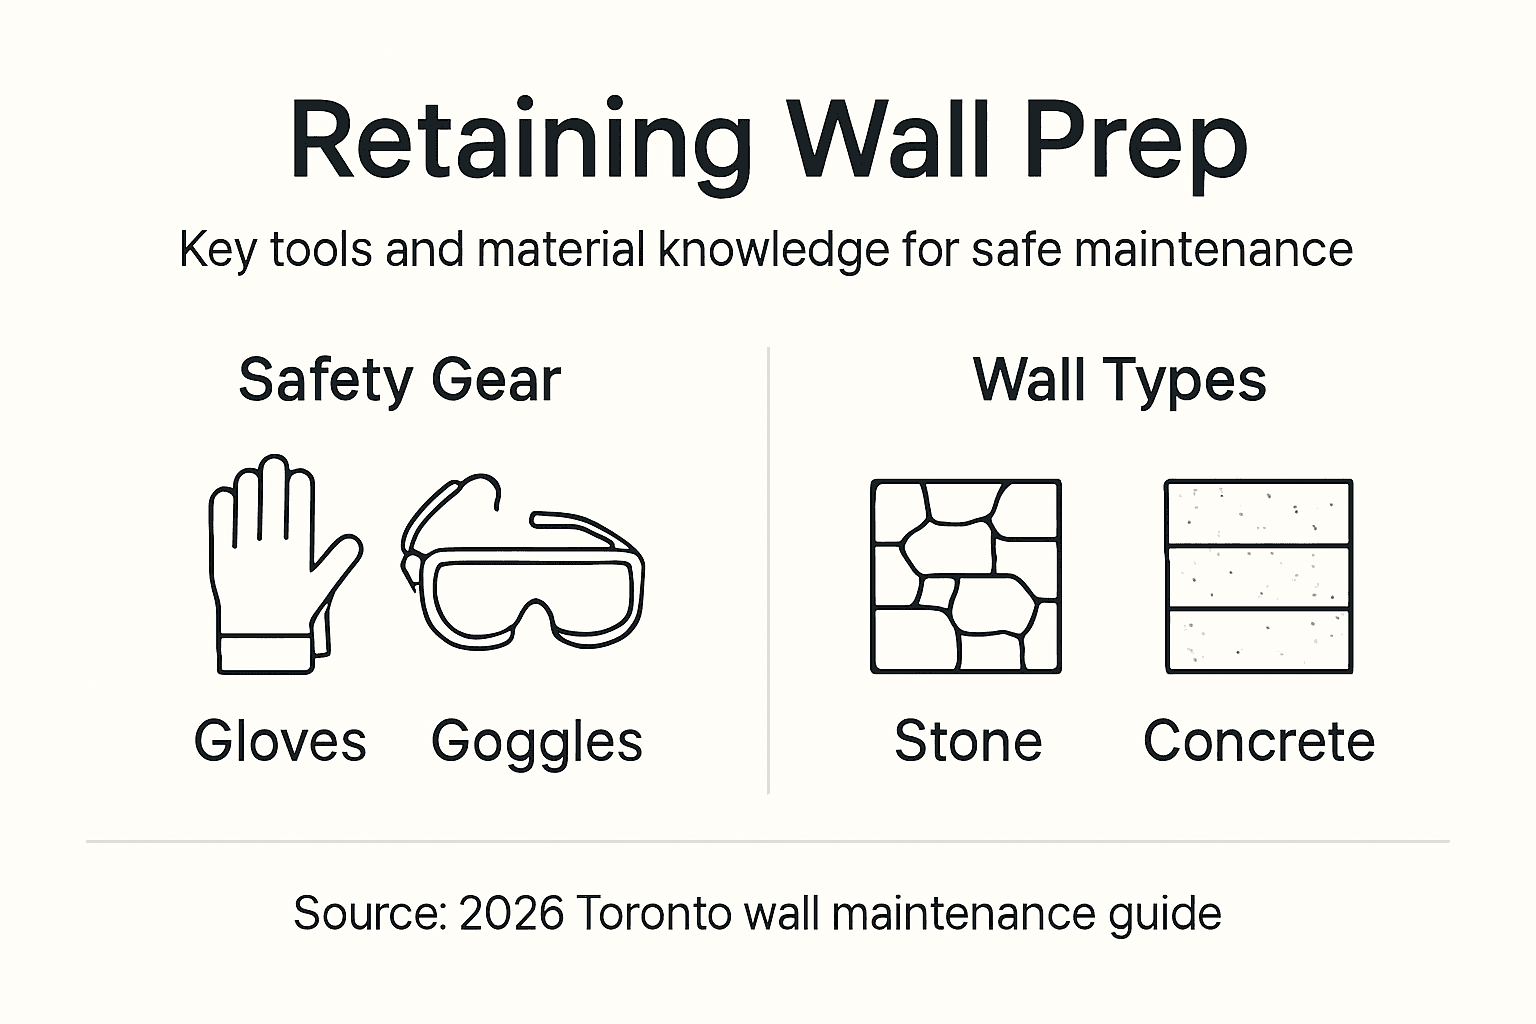
Wall Type | Key Characteristics | Maintenance Priority |
Interlocking blocks | Modular, flexible, drainage-friendly | Monitor joint integrity, drainage |
Poured concrete | Solid, crack-prone | Watch for hairline cracks, seal regularly |
Natural stone | Beautiful, mortar-dependent | Check mortar joints, prevent vegetation |
Timber | Natural look, shorter lifespan | Inspect for rot, replace damaged sections |
Pro Tip: Schedule your first inspection in early May after snowmelt reveals winter damage, then again in late October before the ground freezes. This timing lets you address issues before they worsen through another winter cycle.
Take time to understand your retaining wall type before starting maintenance. Different materials require different care approaches, and knowing yours prevents costly mistakes.
Step 1: regular inspection and early problem detection
Your first defense against major repairs is catching problems early. A systematic inspection takes 30 minutes but can save thousands in emergency repairs.
Visual inspection checklist:
Walk the full length of your wall, examining both sides
Look for bulging sections exceeding 2 inches from vertical
Check for cracks wider than a quarter inch
Note any leaning or tilting from the original position
Document standing water or soil erosion patterns
Regular inspection of retaining walls every 6 months reduces risk of structural failure significantly. The key is consistency. Use the same measuring points each time to track changes accurately.
What to document:
Take photos from identical angles each inspection
Measure crack widths and bulge distances
Note dates and weather conditions
Create a simple log tracking changes over time
This documentation proves invaluable when deciding whether to DIY or call professionals. Signs of retaining wall distress include bulging, cracking, and leaning and indicate urgent repair needs, so recognizing these early gives you options.
Red flags requiring immediate professional evaluation:
Bulging exceeding 2 inches from vertical
Cracks wider than half an inch
Walls leaning more than 5 degrees from vertical
Soil washing out from behind the wall
Standing water that doesn’t drain within 24 hours
Pro Tip: Use a smartphone level app to measure wall angles accurately. Place your phone against the wall at multiple points to detect subtle leaning that’s hard to spot with the naked eye.
For thorough retaining wall structural inspection, consider scheduling a professional assessment every five years even if you see no obvious problems. They catch issues invisible to untrained eyes.
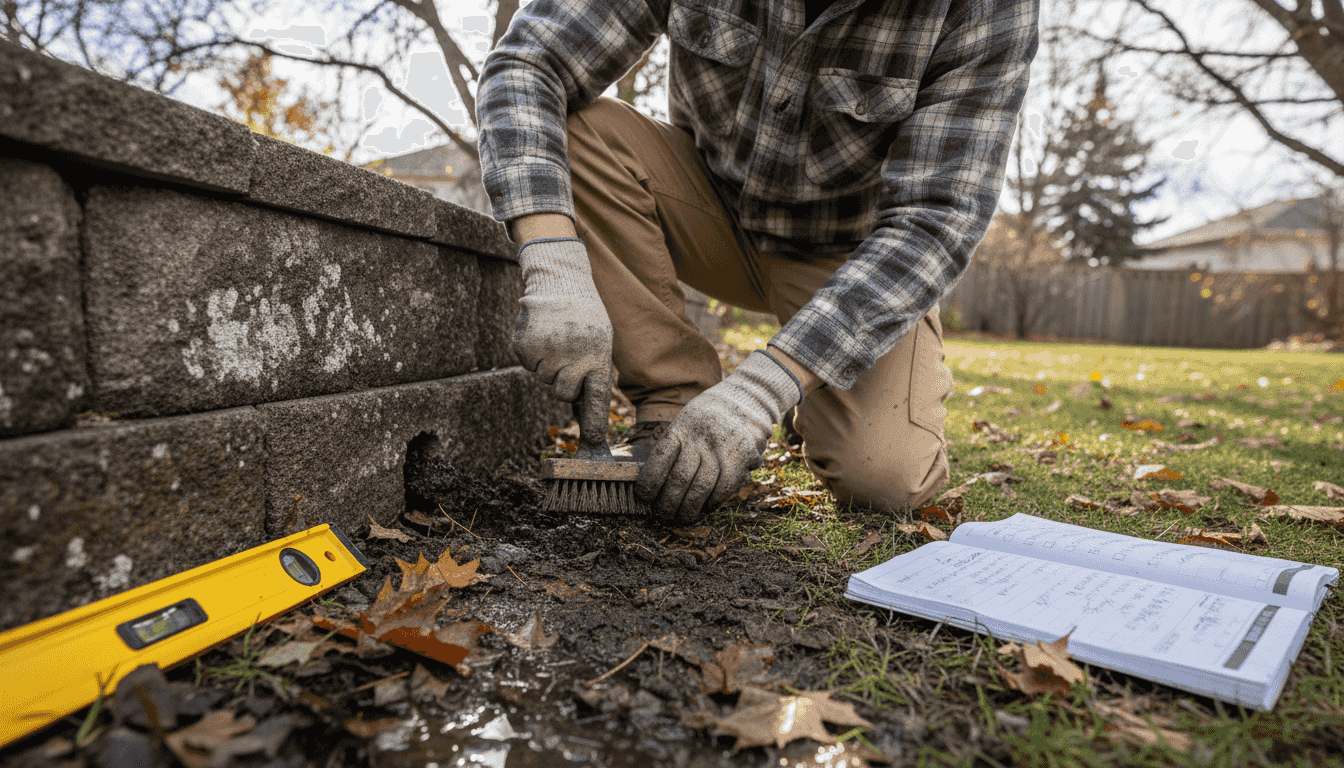
Step 2: cleaning and vegetation control best practices
Once you’ve assessed your wall’s condition, cleaning removes debris that traps moisture and accelerates deterioration. Done correctly, this simple task extends wall life significantly.
Annual cleaning process:
Remove loose dirt and debris with a stiff broom
Mix mild detergent with water in a bucket
Scrub surfaces gently with soft-bristle brushes
Rinse thoroughly with a standard garden hose
Allow complete drying before applying treatments
Never use power washers on retaining walls. High-pressure washing can damage mortar and cause structural problems within a year. The force erodes mortar joints and creates entry points for water, defeating your maintenance purpose.
Vegetation management:
Plants near retaining walls present a double-edged sword. Ground cover reduces soil erosion, but invasive roots damage wall integrity. Strike the right balance.
Remove ivy, Virginia creeper, and other climbers immediately
Pull weeds growing from wall joints before roots establish
Trim bushes back at least 12 inches from wall faces
Consider shallow-rooted ground covers like creeping thyme
Never plant trees within 10 feet of retaining walls
Pro Tip: Apply white vinegar directly to moss and algae growth as a natural, wall-safe cleaning solution. Let it sit for 15 minutes, then scrub gently. This method works without harsh chemicals that might damage surrounding plants or seep into groundwater.
For detailed cleaning and maintenance tips specific to your wall material, reference guides that match your installation type. Learning how different wall types respond to cleaning prevents accidental damage from inappropriate methods.
Step 3: drainage management to prevent damage
Water poses the greatest threat to retaining wall longevity. Managing drainage properly literally makes the difference between a wall lasting 15 years versus 40 years.
Effective drainage behind retaining walls can extend their service life by up to 30%. This isn’t optional maintenance. It’s essential.
Drainage system maintenance:
Inspect weep holes monthly, clearing any blockages
Check that drainage pipes exit freely without soil buildup
Verify gravel drainage layers haven’t become compacted
Look for signs of soil piping behind walls
Test drainage by running water and watching flow patterns
Hydrostatic pressure from trapped water creates forces that no residential retaining wall can withstand indefinitely. Even a few inches of standing water behind your wall generates hundreds of pounds of lateral pressure.
Signs of drainage failure:
Standing water pooling against the wall base
Soil staying saturated days after rain
Efflorescence appearing on wall faces
Accelerated erosion behind the wall
Walls showing stress cracks after heavy rain
Quick drainage fixes:
If you notice drainage problems, act fast. Clear blocked weep holes with a wire brush or compressed air. Add drainage rock behind walls where soil has settled. Install French drains if water consistently pools near walls.
For comprehensive drainage maintenance tips covering Toronto’s specific soil and weather conditions, explore systems designed for our clay-heavy soils. Understanding various drainage systems overview helps you choose the right solutions for your property.
Step 4: protective treatments and seasonal preparation
Protective treatments form your final defense against Toronto’s harsh freeze-thaw cycles. Applied correctly and timely, they prevent water infiltration that causes the most destructive seasonal damage.
Pre-winter protection sequence:
Complete all cleaning and repairs by late October
Apply polymeric sand to joints after thorough drying
Sweep excess sand away and mist lightly to activate
Wait 24 hours for polymeric sand to cure
Apply penetrating sealer following manufacturer specifications
Allow full curing time before first freeze
Applying polymeric sand and sealants before winter protects retaining walls from freeze-thaw damage. Timing matters critically. Sealants need temperatures above 10°C to cure properly, so don’t wait until November.
Sealer selection matters. Choose breathable, penetrating sealers rather than film-forming types. Penetrating sealers allow moisture vapor to escape while blocking liquid water entry, preventing the trapped moisture that causes freeze-thaw spalling.
Application best practices:
Work on dry surfaces only
Apply during mild weather, avoiding extreme heat or cold
Use recommended application tools for even coverage
Never over-apply, which creates surface buildup
Reapply every 2 to 3 years based on wear
For complete seasonal wall protection strategies specific to interlocking and masonry walls, follow manufacturer guidelines matched to your materials. Generic advice often misses critical details.
Common mistakes and troubleshooting tips
Even well-intentioned homeowners make mistakes that undermine their maintenance efforts. Learning these common errors saves your walls from preventable damage.
Top maintenance mistakes to avoid:
Using high-pressure washers that blast out mortar
Ignoring small cracks until they become structural issues
Planting decorative vines that look beautiful but destroy walls
Sealing walls that still contain trapped moisture
Postponing drainage repairs because they’re inconvenient
High-pressure cleaning damages mortar joints causing structural problems within a year. This mistake tops the list because it seems helpful but actually accelerates deterioration dramatically.
Troubleshooting common issues:
If you notice efflorescence, that white powdery residue on wall faces, it signals moisture moving through your wall. Don’t just brush it off. Investigate the water source and improve drainage.
For hairline cracks under a quarter inch, monitor them closely but don’t panic. Mark the ends with permanent marker and measure monthly. Stable cracks rarely indicate structural problems, while growing cracks demand immediate attention.
Pro Tip: Keep a dedicated maintenance journal in a waterproof notebook stored near your tools. Record every inspection, cleaning, and repair with dates and observations. This history becomes invaluable when patterns emerge or you need to explain issues to contractors.
Learn from others’ experiences by reviewing common maintenance mistakes documented by professionals who’ve seen the consequences firsthand. Prevention beats correction every time.
Expected outcomes, costs, and when to call a professional
Realistic expectations help you commit to maintenance and recognize when professional intervention makes sense.
Maintenance outcomes:
With consistent care following this guide, your retaining walls should last 25 to 40 years depending on materials and installation quality. You’ll prevent most major repairs, maintaining both structural integrity and curb appeal.
Cost comparison:
Maintenance Type | DIY Cost | Professional Cost | Frequency |
Bi-annual inspection | $0 | $150 to $300 | Twice yearly |
Annual cleaning | $50 to $100 | $200 to $400 | Yearly |
Sealing treatment | $100 to $200 | $400 to $800 | Every 2-3 years |
Minor crack repair | $50 to $150 | $300 to $600 | As needed |
Drainage clearing | $30 to $75 | $200 to $500 | As needed |
DIY maintenance costs roughly $200 to $400 annually. Professional maintenance runs $800 to $1,500 yearly. However, the time investment matters. DIY requires 6 to 8 hours yearly, while professionals complete work in 2 to 3 hours.
When to hire professionals:
Call experts immediately when walls show bulging over 2 inches, cracks exceeding half an inch, noticeable leaning, or drainage system failures. These issues exceed DIY capabilities and risk catastrophic failure if ignored.
Structural repairs cost $2,000 to $15,000 depending on severity. Complete wall replacement runs $5,000 to $25,000 or more. Compare these figures to annual maintenance costs, and the value of prevention becomes crystal clear.
For expert professional retaining wall services covering inspection, repair, and replacement, consult specialists familiar with Toronto soil conditions and climate challenges. Detailed cost effective maintenance strategies balance DIY efforts with professional expertise.
Recognizing signs needing professional repair early gives you options and prevents emergency situations that always cost more.
Enhance your outdoor space with professional retaining wall solutions
Maintaining retaining walls preserves your outdoor investment, but sometimes professional expertise makes the difference between adequate and exceptional results. Whether you need a comprehensive structural assessment, specialized repairs, or complete wall replacement, working with experienced professionals ensures lasting beauty and durability.

Interlocking Etobicoke brings over 20 years of expertise in designing and installing premium retaining walls throughout Toronto, Etobicoke, and North York. Our professional retaining wall services combine technical knowledge with aesthetic vision, creating walls that enhance curb appeal while standing strong against our region’s demanding climate. Explore our best maintenance practices resources for ongoing care guidance, or discover why we’re recognized for top interlocking installation that transforms ordinary outdoor spaces into beautiful, functional gathering places for families and friends.
Frequently asked questions
How often should I inspect my retaining wall for maintenance?
Inspect your retaining wall twice yearly, ideally in spring after snowmelt and fall before winter. These timing windows let you catch damage early and address issues before harsh weather worsens them. Each inspection takes about 30 minutes and should include checking for cracks, bulging, leaning, and drainage problems.
What are the signs that my retaining wall needs professional repair?
Signs of retaining wall distress include bulging, cracking, and leaning and indicate urgent repair needs. Specifically, bulges exceeding 2 inches from vertical, cracks wider than half an inch, or noticeable leaning require immediate professional evaluation. Drainage failures causing persistent pooling or soil erosion also demand expert assessment, as they indicate underlying structural issues beyond DIY fixes.
Can I use a pressure washer to clean my retaining wall?
No, avoid pressure washers entirely. High-pressure washing can damage mortar causing structural problems by eroding joints and creating water entry points. Instead, use soft-bristle brushes with mild detergent and a standard garden hose. This gentler approach cleans effectively without compromising wall integrity.
How does drainage affect the lifespan of my retaining wall?
Drainage critically impacts wall longevity by controlling hydrostatic pressure and soil erosion. Effective drainage behind retaining walls can extend their service life by up to 30%. Proper drainage prevents water buildup that creates destructive lateral forces and freeze-thaw damage. Maintain clear weep holes, functional drainage pipes, and adequate gravel layers behind walls to maximize their lifespan.
Recommended
Comments