
Master interlocking paver installation for lasting results
- pkgbp02
- 5 days ago
- 10 min read

Homeowners often struggle with interlocking paver installation without clear guidance, leading to shifting, settling, and premature wear. Proper technique ensures your driveway, patio, or walkway withstands Etobicoke, North York, and Toronto winters while boosting curb appeal. This guide walks you through tools, site prep, base compaction, paver laying, joint filling, and troubleshooting to achieve professional quality results that last decades.
Table of Contents
Key takeaways
Point | Details |
Essential preparation | Gathering the right tools and assessing site conditions prevents costly errors and ensures smooth installation. |
Base compaction | Proper compaction to 95% density prevents settling and extends paver lifespan by decades. |
Pattern selection | Herringbone patterns increase driveway load capacity by 30% compared to simpler layouts. |
Joint stabilisation | Polymeric sand reduces weed growth and boosts lifespan by 15% over regular sand. |
Edge restraints | Securing edges with anchored restraints prevents shifting and reduces edge failure by 40%. |
Prerequisites: tools, materials, and site evaluation
Successful installation starts with proper equipment and site assessment. You need a plate compactor for base density, a wet saw for clean cuts, a 4-foot level for flatness checks, string lines for alignment, and a rubber mallet for adjustments. Safety gear includes gloves, eye protection, and dust masks for cutting tasks.
Materials include interlocking pavers in your chosen style, ¾-inch clear stone for the base, polymeric sand for joints, and plastic or metal edge restraints with spikes. Before breaking ground, contact Ontario One Call to locate underground utilities, assess soil drainage by checking for standing water after rain, and verify any municipal permits required for driveway or patio projects.
Tool comparison for interlocking installation
Tool | Purpose | Safety notes |
Plate compactor | Compacts base and sand layers | Wear ear protection, keep hands clear |
Wet saw | Cuts pavers cleanly | Use eye protection, ensure water supply |
4-foot level | Checks flatness and slope | No special precautions |
String line | Maintains alignment | Secure tightly to avoid tripping |
Rubber mallet | Adjusts paver position | Use controlled strikes |
Renting specialised equipment like plate compactors and wet saws saves money compared to purchasing, especially for one-time projects. Most tool rental centres in Toronto offer daily or weekend rates with delivery options.
Pro Tip: Rent a plate compactor with at least 5,000 pounds of compaction force for driveways or any area expecting vehicle traffic to ensure adequate base density.
For detailed guidance on interlocking driveway installation or paver installation techniques, explore our comprehensive resources.
Site preparation and excavation
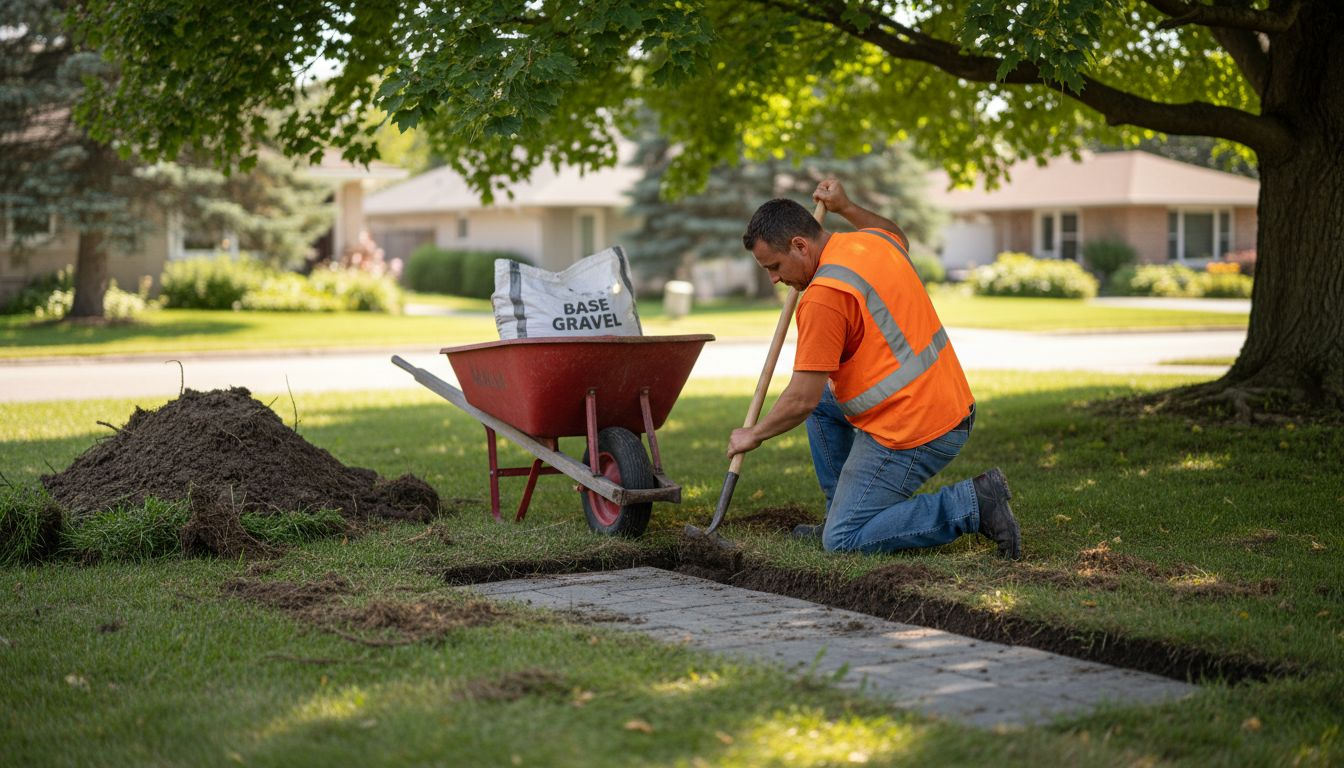
Clearing vegetation and topsoil creates a stable foundation. Remove grass, roots, and organic material extending 150 millimetres beyond your project perimeter to prevent future settling. Mark boundaries with spray paint or stakes, then contact Ontario One Call at least five business days before digging to avoid damaging buried utilities.
Excavate to required depth accounting for your gravel base, bedding sand, and paver thickness. For walkways, dig 200 millimetres deep. Patios need 225 millimetres, while driveways require 250 to 300 millimetres depending on soil conditions. Clay soils demand deeper excavation than sandy or gravelly ground.
Create a gentle slope of 2% away from structures for proper drainage. This equals 6 millimetres of drop per 300 millimetres of distance. Use a laser level or long spirit level with taut string lines to verify slope accuracy across the entire area.
Excavation sequence
Mark project boundaries with stakes and string, adding 150 millimetres on all sides
Contact Ontario One Call and wait for utility location confirmation
Remove all vegetation, topsoil, and organic material within marked area
Excavate to calculated depth using a flat shovel and wheelbarrow
Grade bottom of excavation with 2% slope away from buildings
Compact exposed soil lightly with plate compactor to create firm subgrade
Verify depth and slope with level and measuring tape before proceeding
Pro Tip: Use a laser level or long spirit level with string lines spanning the entire site to maintain consistent slope and catch low spots before adding base material.
For projects requiring durable interlocking driveways in Toronto or additional installation guidance, our detailed guides provide regional insights.
Base installation: gravel layer and compaction
A properly compacted gravel base prevents settling and distributes loads evenly. Spread ¾-inch clear stone in a uniform layer 100 to 150 millimetres thick, depending on your project type. Walkways need 100 millimetres, patios require 125 millimetres, and driveways demand 150 millimetres or more for heavy vehicle traffic.
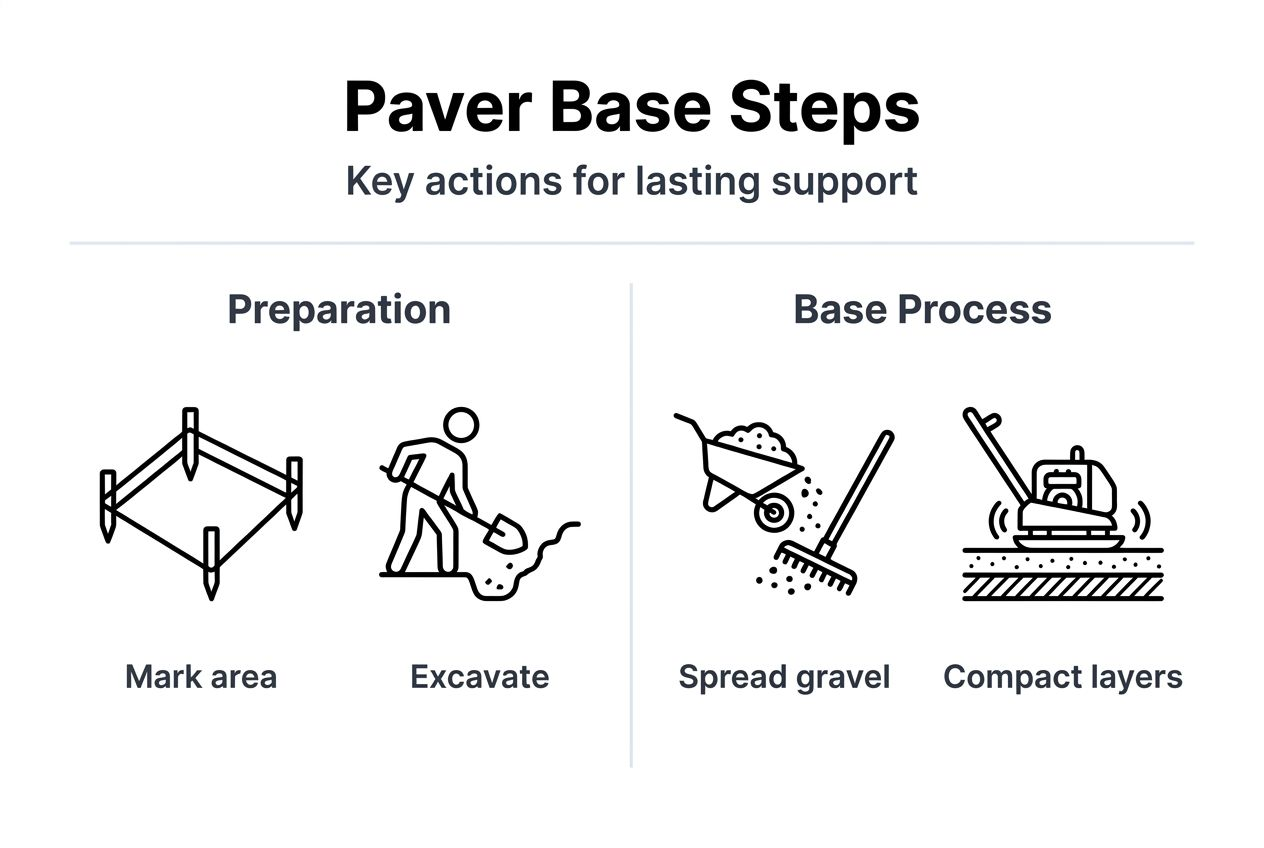
Compact the base to 95% Proctor density using multiple passes with your plate compactor. For bases exceeding 150 millimetres, compact in 75-millimetre lifts rather than all at once to achieve proper density throughout. Each lift should receive at least four passes in different directions.
Check compaction by walking across the surface. Properly compacted stone barely moves underfoot and produces a solid, crunching sound. Loose areas require additional passes until firm.
Base specifications by project type
Project type | Base thickness | Compaction level | Traffic load |
Walkway | 100 mm | 95% Proctor | Foot traffic only |
Patio | 125 mm | 95% Proctor | Furniture, light equipment |
Residential driveway | 150 mm | 95% Proctor | Cars, light trucks |
Commercial driveway | 200 mm | 98% Proctor | Heavy vehicles, frequent use |
Suitable base materials
¾-inch clear stone (most common, excellent drainage)
¾-inch crushed limestone (angular edges lock together well)
Recycled concrete aggregate (environmentally friendly, cost effective)
Dense graded aggregate (less drainage but higher load capacity)
Pro Tip: Lightly moisten gravel with a garden hose before compacting to improve particle bonding and achieve higher density with fewer passes.
Learn more about paver base compaction and durable driveway construction techniques for Toronto area conditions.
Laying pavers: patterns, cutting, and alignment
Pattern selection affects both appearance and structural performance. Herringbone patterns increase load capacity by 30% compared to running bond layouts, making them ideal for driveways. Running bond or basket weave patterns work beautifully for patios and walkways with lighter traffic.
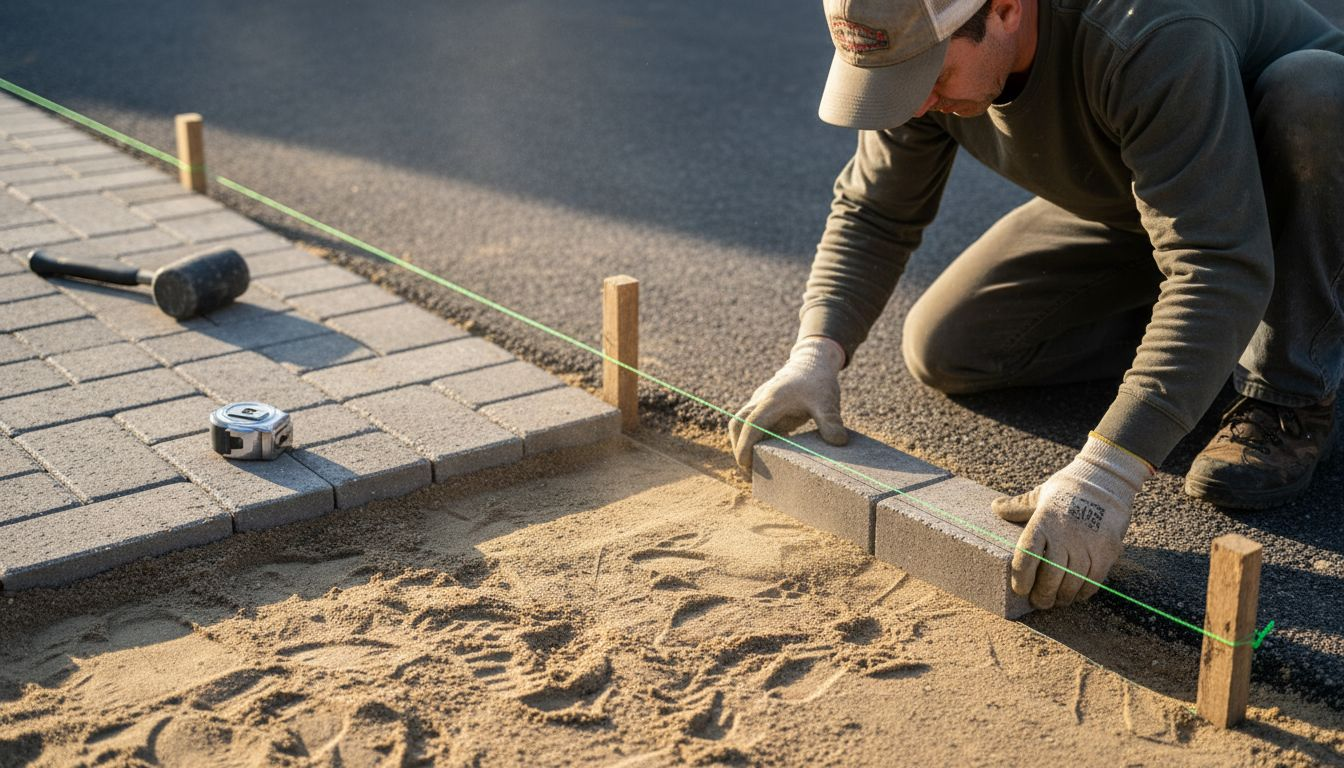
Set string lines parallel to your starting edge to maintain straight rows and consistent spacing. Begin laying from a straight edge or corner, placing pavers tightly together with 2 to 3 millimetre gaps. Check alignment every three rows using your string line and level.
Cut pavers cleanly with a wet saw to reduce chipping, especially for border pieces and curves. Mark cut lines with a pencil, secure the paver firmly, and make smooth, steady passes without forcing the blade. Always wear eye protection and ensure adequate water flow to control dust.
Paver laying sequence
Spread 25 millimetres of bedding sand over compacted base and screed level
Set string lines parallel to starting edge for alignment reference
Begin laying pavers from straight edge or 90-degree corner
Place each paver snugly against neighbours with minimal gaps
Tap gently with rubber mallet to set level, checking with spirit level
Maintain string line alignment, adjusting every third row as needed
Cut border and edge pavers last after field is complete
Check overall levelness across multiple pavers frequently
Tight joints between pavers create structural interlock that distributes loads and prevents individual paver movement. Gaps wider than 5 millimetres weaken this effect and allow excessive joint sand loss.
Explore interlocking driveway options and our paver laying guide for pattern ideas and advanced techniques.
Joint filling and edge restraint installation
Stabilising joints and edges completes your installation. Sweep polymeric sand across the paver surface, working it into joints with a stiff broom. Make multiple passes in different directions until joints fill flush with paver tops. Compact the surface gently with your plate compactor, using a protective pad to avoid paver damage.
Polymeric sand improves weed resistance by 15% compared to regular sand and creates a semi-rigid joint that prevents insect tunnelling and sand washout. After compacting, sweep away excess sand, then mist the surface lightly with water to activate the polymer binding agents. Avoid heavy watering that washes sand from joints.
Install edge restraints along all perimeter edges using plastic or aluminium units designed for pavers. Position restraints against paver edges and anchor with 250-millimetre spikes driven through pre-drilled holes every 300 millimetres. Backfill behind restraints with soil or gravel for additional support.
Installation steps for joints and edges
Sweep polymeric sand across pavers, filling all joints completely
Compact surface with padded plate compactor to settle sand
Add more sand to joints as needed after first compaction
Compact again and sweep away all excess sand from paver surfaces
Position edge restraints snugly against perimeter pavers
Drive spikes through restraint holes into compacted base every 300 mm
Backfill behind restraints with soil, tamping firmly
Mist joints lightly with water to activate polymeric sand binding
Proper edge restraints prevent perimeter pavers from spreading outward under traffic loads, which causes joint widening and eventual surface failure. Skipping this step increases edge problems significantly.
Maintain your investment with guidance from our paver maintenance resource covering weed control and longevity strategies.
Common installation mistakes and troubleshooting
Avoiding frequent errors saves time and ensures lasting results. Inadequate base depth causes settling within months as soil compresses under load. Always excavate to full calculated depth and verify before adding base material. Poor compaction creates the same problem, so make multiple compactor passes until the base feels rock solid.
Skipping edge restraints allows perimeter pavers to shift outward, widening joints and destabilising the entire surface. Install restraints on every project regardless of size. Using regular sand instead of polymeric sand invites weed growth, insect nests, and rapid joint sand loss during rain.
Installations without proper edge restraints experience up to 40% more edge failures within the first two years compared to properly restrained projects, leading to costly repairs and reduced lifespan.
Improper cutting with standard circular saws creates rough, chipped edges that look unprofessional and weaken pavers. Invest in wet saw rental for clean cuts every time.
Common issues and corrections
Insufficient base depth: Excavate deeper and add proper base thickness before proceeding
Loose, poorly compacted base: Make additional compactor passes until surface is firm
Missing edge restraints: Install restraints immediately before traffic uses surface
Regular sand in joints: Remove and replace with polymeric sand for durability
Rough paver cuts: Use wet saw with diamond blade for all cutting tasks
Uneven surface after laying: Lift affected pavers, adjust bedding sand, relay and compact
Check for settling by placing a long straightedge across the surface monthly during the first season. Address low spots promptly by lifting pavers, adding bedding sand, and re-levelling.
Understand the durability benefits of interlocking pavers to appreciate the value of proper installation technique.
Installation timeline, safety considerations, and expected outcomes
A typical 400 square foot project takes two to four days depending on your experience level and site complexity. Day one covers excavation and base installation. Day two focuses on paver laying and cutting. Day three handles joint filling and edge restraint installation. Allow extra time for complex patterns or challenging site conditions.
Safety matters throughout the process. Wear leather gloves when handling pavers to prevent cuts and blisters. Use eye protection whenever operating the wet saw or plate compactor. Dust masks reduce silica exposure during cutting. Ear protection prevents hearing damage from compactor noise.
Safety and workflow essentials
Wear gloves, eye protection, and dust mask during all cutting operations
Use ear protection when operating plate compactor for extended periods
Lift pavers using proper technique, bending knees and keeping back straight
Take frequent breaks during compaction and heavy lifting to prevent fatigue
Keep work area clear of tripping hazards like tools and excess materials
Start early in the day during summer to avoid peak heat
Work systematically from one end to the other to maintain quality
Properly installed pavers show no settling after six months and maintain stable, even surfaces for decades. Edges remain firmly in place without spreading or sinking. Weed growth stays minimal thanks to polymeric sand joints. With basic maintenance like sweeping, occasional joint topping, and periodic edge checks, your installation lasts 25 years or more.
Ongoing maintenance involves sweeping debris monthly, inspecting joints annually and adding polymeric sand where needed, checking edge restraints for firmness each spring, and power washing every two to three years to refresh appearance. These simple tasks preserve your investment and keep the surface looking new.
Review our guide to paver maintenance and lifespan for detailed care instructions tailored to local climate conditions.
Discover professional interlocking installation services in your area
While this guide empowers capable DIY enthusiasts, some projects benefit from professional expertise. Complex drainage issues, large driveway installations, or intricate pattern designs often require specialised knowledge and commercial-grade equipment. Interlocking Etobicoke has transformed outdoor spaces across Etobicoke, North York, and Toronto for over two decades.
Our team handles everything from initial design consultation through final polymeric sand application, ensuring your patio, driveway, or walkway exceeds expectations. We also offer expert retaining wall solutions that complement paver installations beautifully, creating cohesive outdoor living spaces.
Whether you need guidance on a DIY project or prefer professional installation, our premium interlocking services provide reliable solutions backed by decades of experience. Contact us for a consultation tailored to your property’s unique needs.
FAQ
What tools are absolutely necessary for interlocking paver installation?
A plate compactor, wet saw, 4-foot level, string line, and rubber mallet form the essential toolkit. The compactor ensures proper base density, while the wet saw creates clean cuts without chipping. Rental options make these affordable for single projects.
How long does a typical DIY interlocking paver installation take?
A 400 square foot area typically requires two to four days for completion. Excavation and base installation consume day one, paver laying fills day two, and joint filling plus edge restraints occupy day three. Complex patterns or challenging sites extend timelines.
Why is polymeric sand preferred over regular sand for joints?
Polymeric sand binds joints through polymer activation when moistened, creating semi-rigid connections that resist weeds and insects. This increases installation lifespan by 15% compared to regular sand, which washes away easily and invites weed growth.
What are common errors to avoid during installation?
Insufficient base depth, poor compaction, missing edge restraints, using regular instead of polymeric sand, and improper cutting techniques cause most failures. Always excavate to full depth, compact thoroughly, secure all edges, and use proper equipment for professional results.
How can I maintain my interlocking paver surface to extend its life?
Sweep debris monthly to prevent staining and drainage issues. Inspect joints annually, topping with polymeric sand as needed. Check edge restraints each spring for firmness. Power wash every two to three years to refresh appearance and remove organic buildup.
Recommended
Comments