
How to build a retaining wall in Etobicoke (2026 guide)
- pkgbp02
- Mar 6
- 9 min read

Many Etobicoke homeowners face expensive repairs when retaining walls fail due to inadequate drainage and foundations that sit above the frost line. Building a wall that stands strong for decades requires understanding local soil conditions, proper excavation depth, and drainage systems tailored to Ontario’s freeze-thaw cycles. This guide walks you through every step to construct durable, attractive retaining walls that enhance your property and withstand Etobicoke’s climate challenges.
Table of Contents
Key takeaways
Point | Details |
Permit requirements | Walls above 1.2 metres require building permits and engineering review in Etobicoke. |
Material durability | Concrete blocks offer 50+ years lifespan with proper installation and minimal upkeep. |
Drainage impact | Proper drainage and backfill compaction reduce failure risks by up to 70%. |
Foundation depth | Excavate footings below 1.2 metres to avoid frost heave damage. |
Project timeline | Typical construction spans 3 to 7 days depending on material and wall size. |
Introduction and what you need before starting
Before breaking ground, confirm whether your project requires a building permit. In Etobicoke, walls above 1.2 metres require permits and engineering review. Even smaller walls benefit from understanding retaining wall basics to avoid structural issues.
Gather these essential tools and materials:
Shovel and excavation equipment for digging footings
Plate compactor for backfill and base preparation
Spirit level and measuring tape for alignment checks
Perforated drainage tubing and gravel for water management
Work gloves, safety glasses, and sturdy footwear
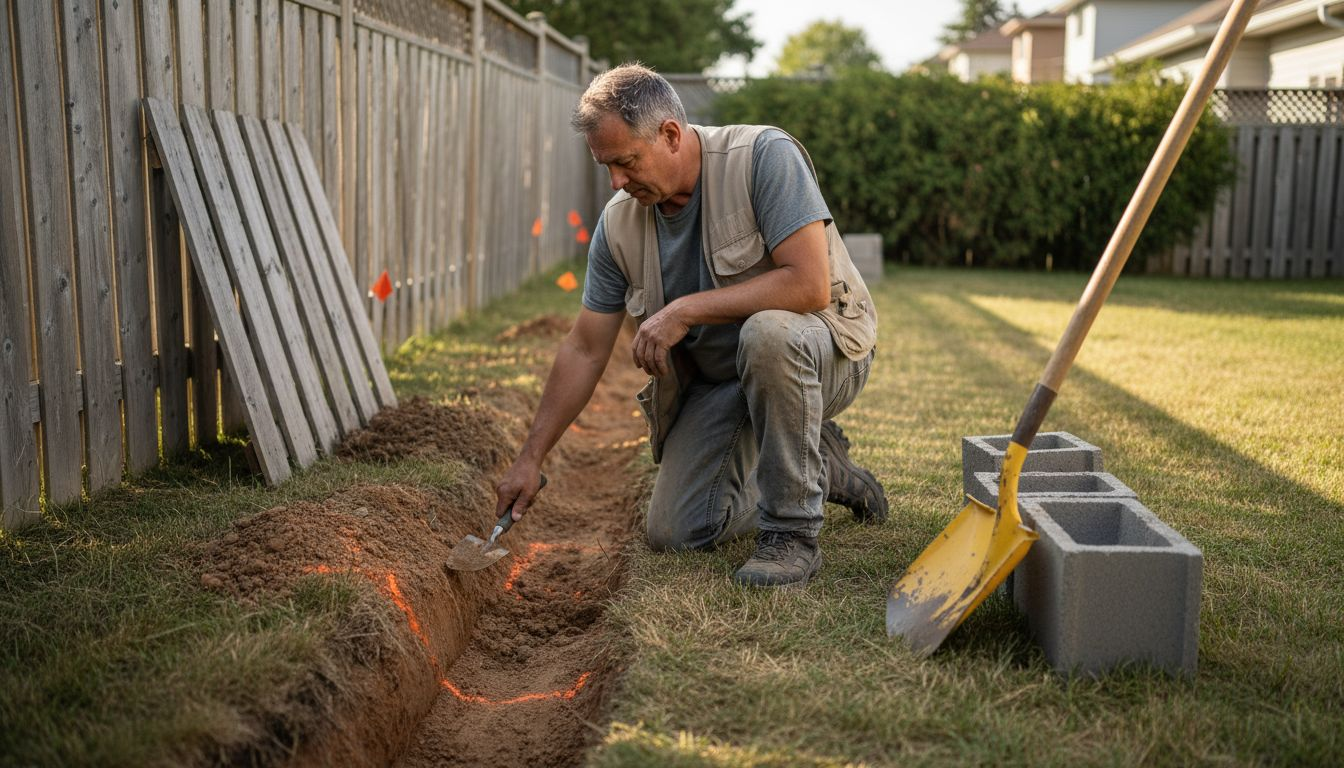
Assess your property’s soil type and slope. Sandy soils drain well but may need deeper footings, whilst clay soils retain water and demand robust drainage systems. Etobicoke’s frost depth sits around 1.2 metres, meaning your foundation must reach below this line to prevent seasonal heaving. Walk your site and identify where water naturally flows during rain. This tells you where drainage pipes should redirect moisture away from the wall.
Pro Tip: Contact Ontario One Call before digging to mark underground utilities. Hitting a gas line or fibre optic cable turns a weekend project into an expensive emergency.
Research local bylaws beyond just permits. Some neighbourhoods have height restrictions or setback requirements from property lines. Spending an hour reviewing regulations now saves weeks of headaches if you need to rebuild a non-compliant wall.
Selecting materials suitable for Etobicoke’s climate and soil
Material choice determines how long your wall lasts and how much maintenance it demands. Segmental concrete blocks have a median lifespan exceeding 50 years with proper installation, making them the most popular option for Etobicoke projects. These blocks cost less than natural stone and handle freeze-thaw cycles better than timber.
Material | Lifespan | Initial Cost | Maintenance | Best For |
Concrete blocks | 50+ years | Moderate | Low | Most residential projects |
Natural stone | 75+ years | 15-35% higher | Very low | Premium aesthetics |
Timber | 15-20 years | Lowest | High | Temporary or budget builds |
Concrete blocks offer design flexibility with various colours, textures, and sizes. They interlock without mortar, allowing slight movement without cracking. This matters in Etobicoke where ground shifts during spring thaws. The modular design also simplifies repairs if one block gets damaged.
Natural stone delivers unmatched visual appeal and weathers beautifully over decades. Limestone and granite resist moisture absorption better than softer stones. Expect to pay 15 to 35 percent more than concrete, plus higher labour costs since each stone needs individual fitting. For front-yard feature walls where aesthetics justify the investment, stone creates a premium look that boosts curb appeal.
Timber suits temporary applications or garden beds under one metre tall. Pressure-treated wood lasts 15 to 20 years but requires annual sealing and inspection for rot. Ontario’s wet springs accelerate decay, making timber less suitable for permanent structural walls. Understanding retaining wall types helps you match materials to your specific needs.
Pro Tip: Use segmental blocks with geogrid reinforcement for best practices for retaining walls in Etobicoke’s freeze-thaw climate. The reinforcement grid extends into the backfill, distributing loads and preventing displacement during spring thaws.
Ground preparation and drainage installation
Excavate your footing trench to a minimum depth of 1.2 metres to get below Etobicoke’s frost line. Shallow foundations heave when frozen ground expands, cracking walls and causing displacement. Dig the trench width to accommodate your block size plus 150 millimetres on each side for drainage gravel.
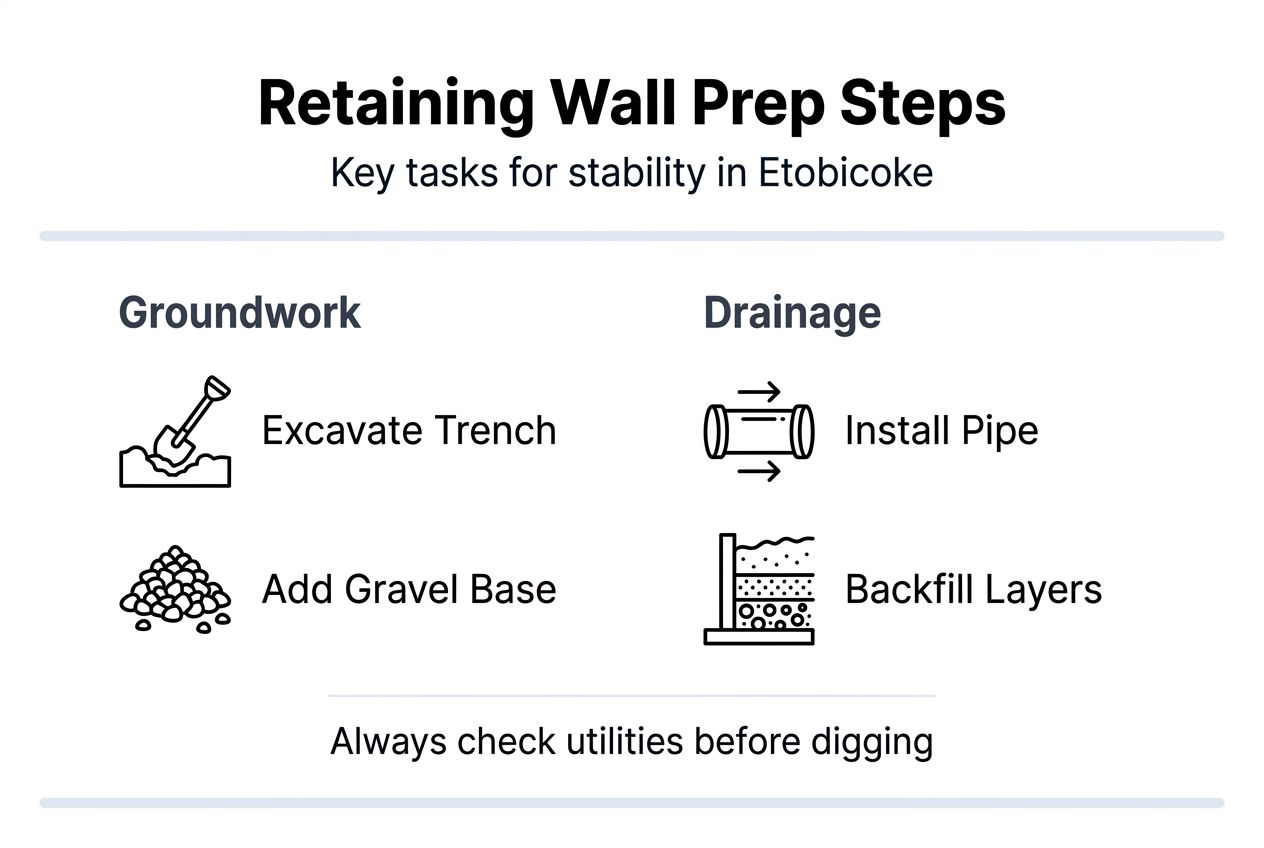
Install perforated drainage pipes behind the base of the wall before backfilling. These pipes redirect groundwater away from the structure, preventing hydrostatic pressure buildup. Position pipes with perforations facing down, wrapped in filter fabric to prevent soil clogging. Slope the pipes at least 2 percent grade so water flows toward a drainage outlet or dry well.
Use clear gravel backfill to facilitate water drainage and reduce pressure on the wall. Proper drainage installation can reduce failure risk by up to 70 percent compared to walls without drainage systems. The gravel creates a path for water to reach the drainage pipe instead of pushing against the wall.
Follow this drainage installation sequence:
Excavate the full footing depth and width
Compact the trench bottom with a plate compactor
Lay a 150-millimetre gravel base and compact again
Position perforated drainage pipe along the back edge
Check pipe slope with a level before covering
Add filter fabric over the pipe to prevent clogging
Pro Tip: Confirm your site slope and soil type to design drainage that prevents water pooling and frost heave. Clay soils need more aggressive drainage than sandy loam. If your yard has poor natural drainage, extend pipes to discharge at least three metres from the wall or connect to a storm sewer if codes permit. The retaining wall installation process includes detailed drainage specifications.
Stepwise construction process for stability and longevity
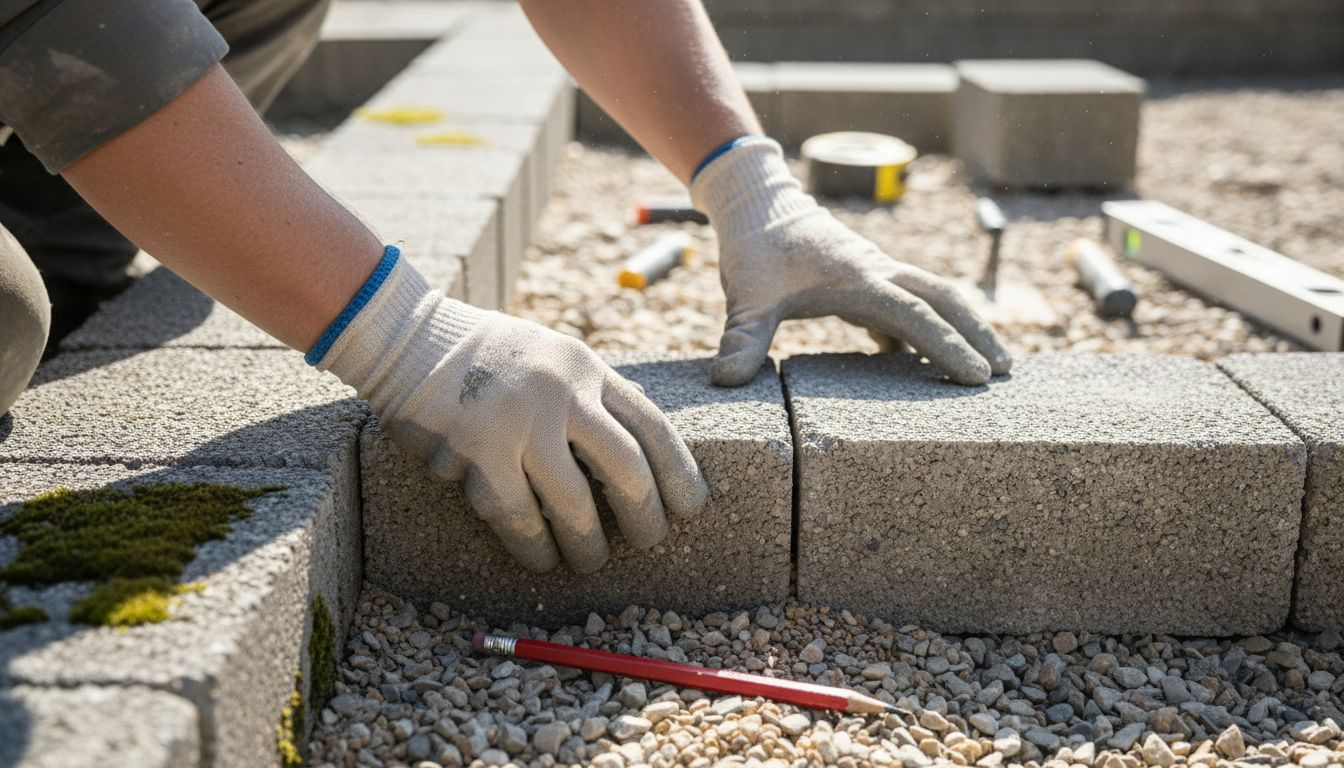
Start with a compacted gravel base to form a stable foundation. Spread 150 to 200 millimetres of clear gravel in the footing trench and compact it thoroughly with a plate compactor. This base prevents settling and provides drainage beneath the wall. Check for level across the entire base length, adjusting gravel depth as needed.
Lay your first course of blocks or stones carefully. This base row determines alignment for the entire wall, so use a spirit level frequently and adjust before proceeding. Most segmental blocks have a built-in setback lip that angles each course slightly backward for stability. Clean off any dirt or debris from block surfaces before stacking.
Install geogrid reinforcement for walls over one metre tall to reduce displacement by up to 50 percent. Geogrid is a synthetic mesh that extends into the backfill soil, anchoring the wall against lateral earth pressure. Lay the grid on each course as specified by your block manufacturer, typically every 600 millimetres of height. The grid should extend back into the soil at least 1.2 times the wall height.
Backfill soil in 150 to 200 millimetre layers behind the wall as you build upward:
Place one course of blocks, checking level and alignment
Backfill behind the course with gravel or approved soil
Compact the backfill thoroughly with a plate compactor
Add geogrid if required at that height
Repeat for each subsequent course
Compact each backfill layer before adding the next course. Poor compaction lets soil settle over time, removing support from the wall and causing it to lean or collapse. Stay at least 150 millimetres away from the wall face when compacting to avoid shifting blocks. Understanding retaining wall structural principles ensures proper load distribution.
Finish the top with a capstone course for aesthetics and protection. Capstones are flat-topped units that prevent water infiltration into the wall core. Secure them with construction adhesive designed for outdoor masonry use. Step back periodically during construction to verify the wall looks straight and plumb from a distance. Small alignment errors multiply as you build higher.
Common mistakes to avoid and how to fix them
Improper backfill compaction increases failure risk by approximately 40 percent. Many DIY builders rush this step, throwing soil behind the wall without compacting each layer. Loose backfill settles over months, removing support and causing the wall to lean forward. Fix this by excavating behind a leaning wall, adding proper drainage if missing, then backfilling in thin layers with thorough compaction.
Neglecting drainage causes hydrostatic pressure buildup that cracks walls or pushes them outward. Water-saturated soil weighs significantly more than dry soil and exerts tremendous force. If you notice water pooling behind your wall or damp spots on the face, drainage is inadequate. Retrofit drainage by excavating behind the wall, installing perforated pipe and gravel, then backfilling properly.
Shallow foundations risk frost heave and seasonal displacement. Walls built on footings above the frost line move up and down with freezing cycles, cracking blocks and destroying alignment. There is no easy fix for shallow foundations. You must dismantle the wall, excavate deeper, and rebuild from a proper footing depth.
Other frequent errors include:
Skipping the gravel base, building directly on soil
Using inconsistent block types that do not interlock properly
Forgetting to check level frequently during construction
Ignoring manufacturer installation guidelines for your specific blocks
Placing heavy loads too close to the wall before backfill settles
Pro Tip: Regularly inspect your wall for early signs of movement or water pooling and address issues promptly. Cracks wider than three millimetres, bulging sections, or tilting indicate structural problems. Catching these early lets you reinforce the wall before complete failure. Follow retaining wall maintenance tips to extend wall life and catch problems before they become expensive.
Project timelines, costs, and expected outcomes
Typical build duration ranges from 3 to 7 days depending on material choice and project complexity. A simple 10-metre concrete block wall under one metre tall takes a skilled DIYer about three days. Taller walls with geogrid reinforcement, curves, or stairs extend timelines to a week or more. Weather delays are common in spring and autumn when rain interrupts excavation and compaction work.
Project Factor | Range | Notes |
Duration | 3-7 days | Add time for permits and material delivery |
Material cost | $50-180/m² | Concrete blocks on low end, stone on high end |
Labour (professional) | $80-150/m² | Varies by wall height and site access |
Permit fees | $200-600 | Required for walls above 1.2 metres |
Natural stone costs on average 15 to 35 percent more than concrete blocks but offers premium aesthetics that some homeowners find worth the investment. Budget accordingly for materials, labour if hiring professionals, equipment rental, and permits to avoid surprises mid-project.
Success metrics include no visible displacement after the first winter, proper drainage functioning during spring runoff, and a foundation confirmed below frost depth. Properly constructed walls with drainage and compaction can last 50 plus years with minimal maintenance. You should see no cracks wider than hairline thickness, no bulging or leaning sections, and no water pooling behind the wall.
Expect your yard to look disrupted during construction. Excavation creates large soil piles that need disposal or redistribution. Protect nearby plants and grass with plywood or tarps. Plan for extra topsoil to fill and grade areas behind the wall once construction finishes. Realistic expectations about temporary mess and project duration prevent frustration. Understanding retaining wall lifespan insights helps you appreciate the long-term value of proper construction.
Enhance your Etobicoke property with expert retaining wall services
Building a retaining wall yourself teaches valuable skills, but professional installation guarantees results that meet local codes and withstand Ontario’s climate challenges.

Interlocking Etobicoke brings over 20 years of experience transforming outdoor spaces with durable expert retaining wall services throughout Etobicoke, North York, and Toronto. Our team handles every aspect from permit applications and engineering assessments to drainage solutions in Etobicoke that prevent costly water damage. We use premium materials and proven techniques to build walls that last 50 plus years with minimal upkeep.
Whether you need a terraced garden wall, a structural barrier for a sloped yard, or an elegant front entrance feature, we customise designs to match your vision and budget. Our comprehensive approach includes site assessment, material selection guidance, professional installation, and post-project support. Get a competitive quote and discover how premium interlocking installation elevates your property’s curb appeal whilst solving practical landscaping challenges.
Frequently asked questions
How deep should the foundation footing be for a retaining wall in Etobicoke?
Footings must reach at least 1.2 metres deep to sit below Etobicoke’s frost line. This prevents seasonal ground movement from heaving the wall upward during winter freezes. Shallow foundations cause cracking and displacement within the first year.
Do I need a building permit to build a retaining wall in Etobicoke?
Walls higher than 1.2 metres require a building permit and engineering approval in Etobicoke. Shorter walls may still need permits if they support structures or sit near property lines. Check with the City of Toronto Building Division before starting your project.
What materials are best for long-lasting retaining walls in Etobicoke?
Segmental concrete blocks with reinforcement last 50 plus years and require minimal maintenance in Ontario’s climate. Natural stone offers premium aesthetics and even longer lifespans but costs 15 to 35 percent more. Timber works for temporary applications but only lasts 15 to 20 years with regular upkeep.
How can I prevent retaining wall failure due to water pressure?
Install perforated drainage pipes and gravel backfill behind the wall to redirect water and prevent hydrostatic pressure buildup. Proper soil compaction in layers also helps by maintaining support and preventing settlement. These measures reduce failure risk by up to 70 percent compared to walls without drainage systems.
Recommended
Comments