
Build durable interlocking driveways in Toronto: 25+ years
- pkgbp02
- 6 days ago
- 9 min read

Many Toronto driveways crack or shift within five years due to harsh freeze-thaw cycles and poor construction. The difference between a failing driveway and one lasting decades lies in proper base preparation, suitable materials, and climate-conscious installation. This guide empowers homeowners to build interlocking driveways that resist Toronto’s weather extremes while boosting curb appeal and property value.
Table of Contents
Key takeaways
Point | Details |
Base preparation is critical | [Proper 4-6 inch compacted gravel base](https://interlockingetobicoke.ca/post/interlocking driveway installation guide homeowners) prevents frost heave and shifting during freeze-thaw cycles. |
Use polymeric sand | Polymeric sand increases durability by 30% compared to regular sand, reducing weeds and insect damage. |
Design for drainage | Minimum 1-2% slope and permeable base layers prevent water pooling that causes frost damage. |
Plan materials carefully | Low water absorption pavers and geotextile fabric tailored to Toronto’s climate ensure longevity. |
Maintenance extends lifespan | Regular cleaning, joint refilling, and sealing protect your investment beyond 25 years. |
Introduction to interlocking driveways in Toronto
Interlocking driveways add curb appeal and improve functionality in residential settings across Toronto neighbourhoods. They transform plain concrete into attractive, customisable surfaces that boost property value. Yet Toronto’s climate poses unique challenges. Temperatures swing from summer heat to winter freezes, creating cycles that crack concrete and shift poorly constructed surfaces.
Durability depends largely on correct base preparation and choosing paver materials tailored to local weather conditions. Many homeowners believe interlocking driveways require constant repairs, but this misconception stems from shortcuts during installation. When built properly with climate-conscious methods, these driveways outlast traditional options.
Consider these climate-specific challenges:
Freeze-thaw cycles cause water trapped beneath pavers to expand, lifting and cracking surfaces.
Poor drainage leads to pooling, accelerating frost damage and creating safety hazards.
Low-quality pavers absorb moisture, making them vulnerable to splitting during freezing.
Choosing the right [interlocking driveway options in Etobicoke](https://interlockingetobicoke.ca/post/interlocking driveway options etobicoke) means understanding how materials and construction methods address these issues. The investment in proper technique pays dividends through decades of reliable service and maintained curb appeal.
What you need before starting: tools, materials, and planning
Starting unprepared guarantees problems down the line. Gather all necessary tools and materials before breaking ground. You’ll need excavation tools including shovels, wheelbarrows, and an industrial plate compactor for proper base compaction. Screed boards help level bedding sand, while stakes and string lines maintain accurate layout.
[Selecting materials suited for freeze-thaw conditions](https://interlockingetobicoke.ca/post/interlocking driveway options etobicoke) is essential for long-term durability. Here’s what you need:
Material | Purpose | Specification |
¾ clear gravel | Load-bearing base layer | 4-6 inches compacted depth |
Geotextile fabric | Weed barrier and layer separation | Heavy-duty landscape fabric |
Bedding sand | Paver cushion layer | 1 inch levelled |
Polymeric sand | Joint filling | Weather-resistant formula |
Interlocking pavers | Surface material | Low water absorption rated |
Layout planning determines long-term performance. Calculate your driveway’s slope to achieve 1-2% grade for proper drainage. Water must flow away from your home and garage, preventing pooling that causes frost damage. Measure twice, excavate once.
Essential planning steps:
Mark driveway boundaries with stakes and string lines.
Identify drainage direction and plan slope accordingly.
Calculate material quantities based on excavation depth and surface area.
Check local regulations for permit requirements.
Pro Tip: Rent specialised equipment like industrial plate compactors rather than purchasing. Professional-grade tools ensure proper compaction that handheld tampers cannot achieve. Consider consulting an [interlocking driveway installation guide for homeowners](https://interlockingetobicoke.ca/post/interlocking driveway installation guide homeowners) if you’re unsure about equipment or techniques.
Step 1: base preparation and excavation
Excavation depth makes or breaks your driveway’s longevity. [Toronto’s climate demands 8-12 inch excavation](https://interlockingetobicoke.ca/post/interlocking driveway installation guide homeowners) to reach below the frost line. Shallow bases shift during freeze-thaw cycles, cracking your surface within seasons.
Follow these excavation steps:
Remove existing pavement, soil, or vegetation down to stable subgrade.
Compact the exposed subgrade thoroughly using a vibratory plate compactor.
Lay geotextile fabric across the entire excavated area to prevent weed intrusion.
Spread ¾ clear gravel in 2-inch layers, compacting each layer before adding the next.
Build up to a 4-6 inch compacted gravel base for optimal load bearing and drainage.
Verify level and slope using a laser level or string lines.
Compaction cannot be overstated. Each gravel layer must be compacted until the plate compactor bounces back, indicating maximum density. Loose base material settles over time, creating dips and uneven surfaces that trap water.
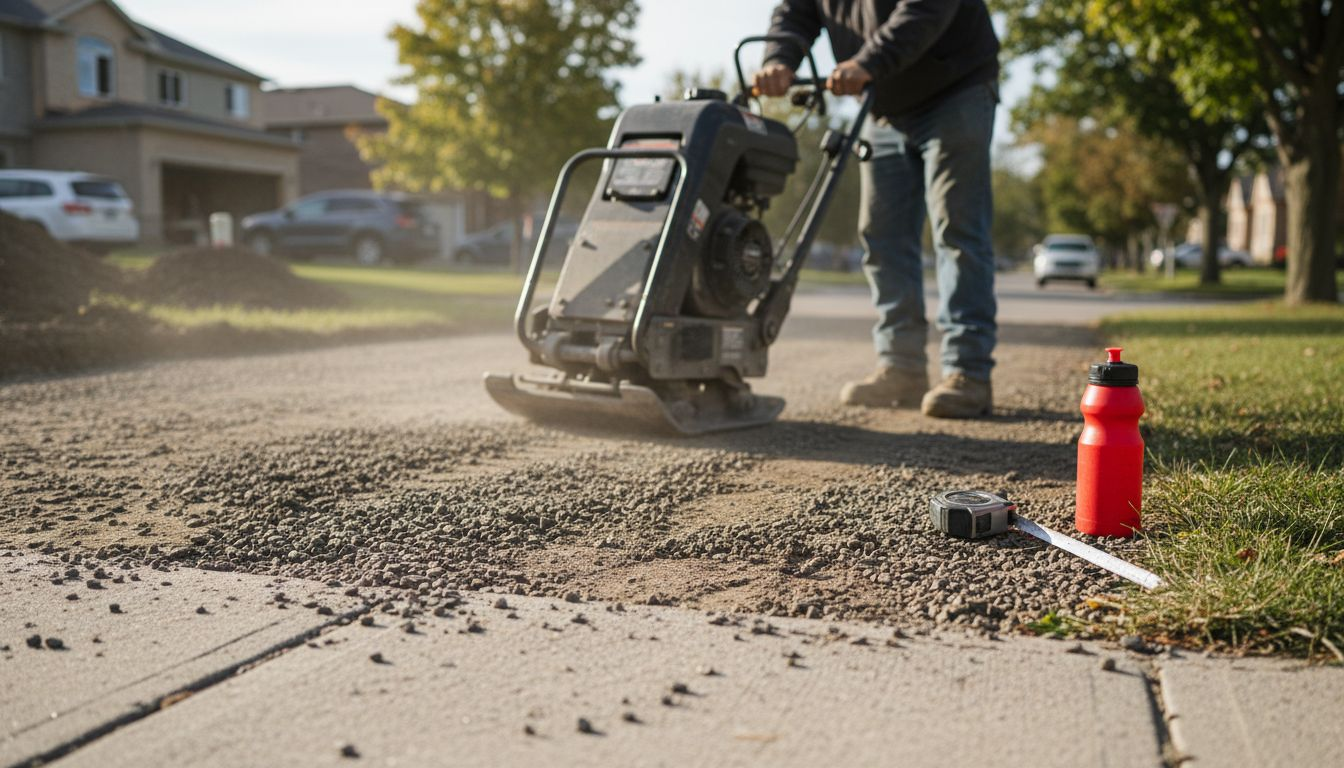
The geotextile fabric serves dual purposes. It stops weeds from growing up through your driveway while preventing gravel from mixing into the subgrade soil. This separation maintains the base’s structural integrity and drainage capacity.
Pro Tip: Check compaction by walking across the base. If your footprints sink more than a quarter inch, compact again. Professional installers often make three passes with the plate compactor per layer. Verify your [base depth and compaction standards](https://interlockingetobicoke.ca/post/interlocking driveway installation guide homeowners) match local frost line requirements.
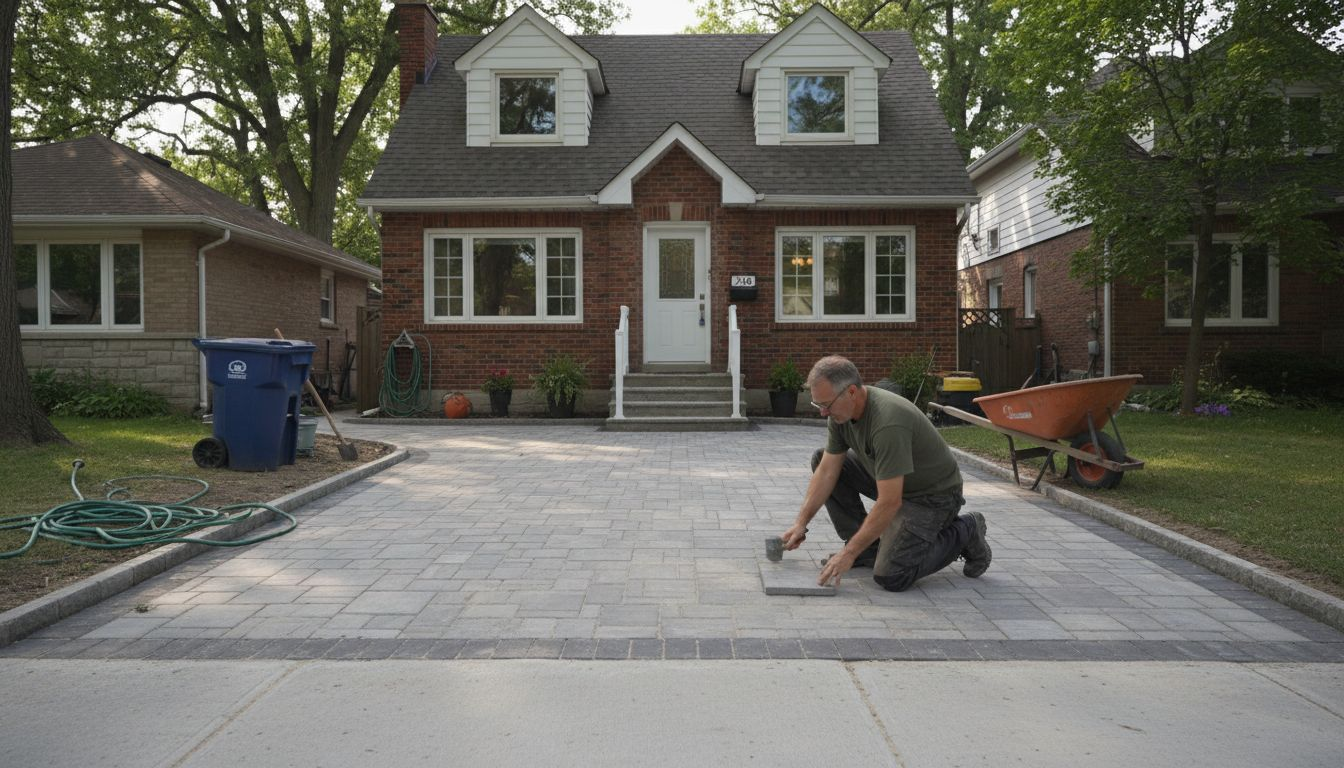
Step 2: installation techniques and materials
Proper layering transforms your prepared base into a durable surface. Start by spreading bedding sand evenly across the compacted gravel base. Use screed boards to level this layer to exactly 1 inch depth. Bedding sand cushions pavers and allows minor adjustments during placement.
Follow these installation steps:
Spread bedding sand and screed to uniform 1-inch depth.
Begin laying pavers from a straight edge, typically the garage or property line.
Place each paver tightly against neighbours, maintaining consistent gaps.
Cut edge pavers with a masonry saw to fit boundaries precisely.
Sweep polymeric sand across the surface, filling all joints completely.
Compact pavers with a plate compactor fitted with a protective pad.
Add more polymeric sand if joints settle, then compact again.
Lightly mist the surface to activate polymeric sand bonding.
Paver placement requires patience and precision. Work in sections, checking alignment regularly with string lines. Inconsistent gaps create weak points where shifting begins. Maintain your chosen pattern throughout, cutting partial pavers only at edges.
Polymeric sand increases durability by 30% compared to regular sand by hardening after wetting. This locks pavers together while preventing weed growth and insect intrusion. Regular sand washes out during rain, allowing movement and creating spaces for weeds.
Advantages of polymeric sand:
Hardens to resist erosion from rain and snow melt.
Prevents ants and other insects from nesting in joints.
Reduces weed germination by eliminating soil contact.
Maintains joint integrity through freeze-thaw cycles.
Final compaction settles pavers into bedding sand and vibrates polymeric sand deep into joints. Use gentle passes to avoid cracking pavers. The surface should feel solid underfoot with no movement when walked on. Proper [interlocking driveway installation](https://interlockingetobicoke.ca/post/interlocking driveway installation guide homeowners) creates a monolithic surface that distributes weight evenly.
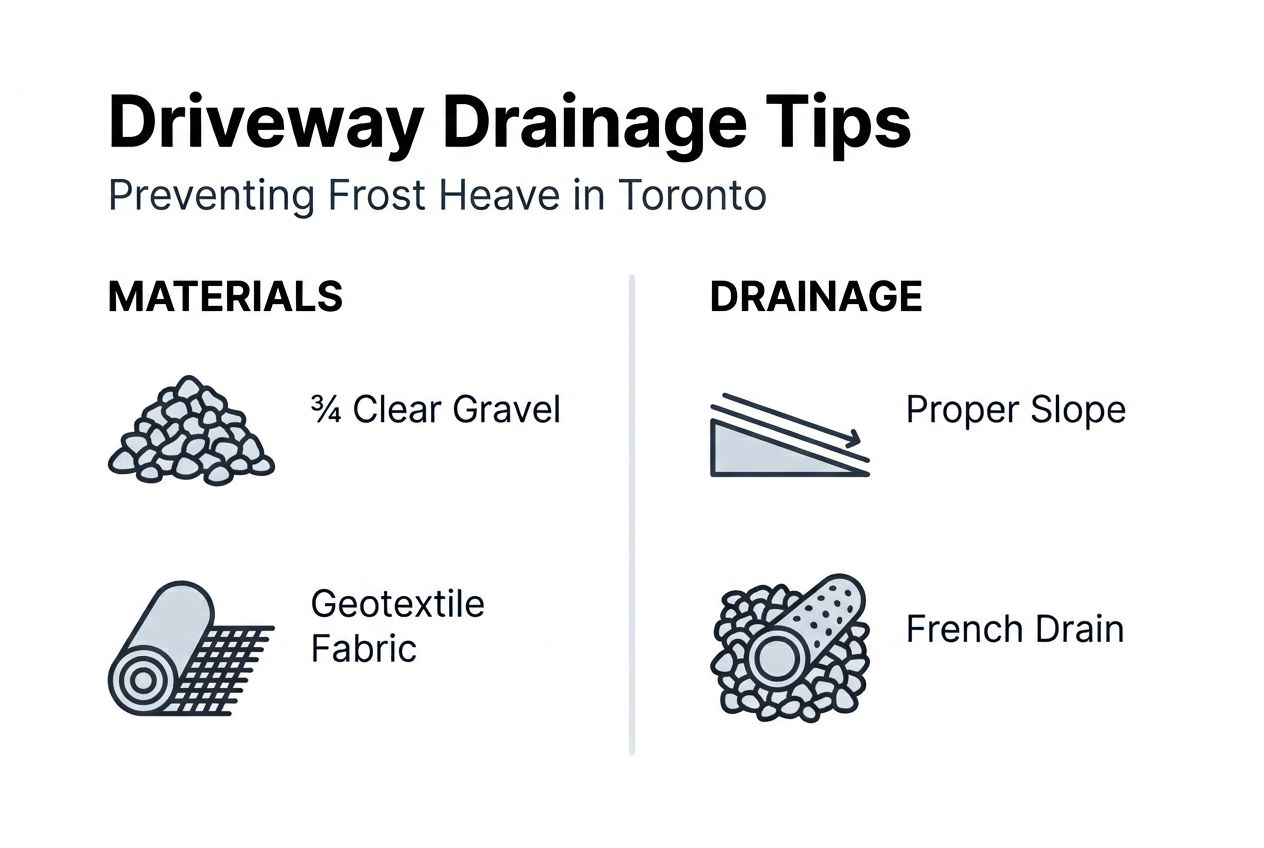
Step 3: drainage and frost prevention
Water is your driveway’s greatest enemy. Poor drainage causes 80% of premature interlocking driveway failures in Toronto. Design with 1-2% slope minimum for efficient runoff that prevents pooling. Water pooling on surfaces seeps into joints, freezes, and expands, lifting pavers and cracking the base.
Permeable base materials enhance drainage under the surface. The ¾ clear gravel you installed allows water to percolate downward rather than pooling. This prevents hydrostatic pressure that causes frost heave during winter months.
Comparing drainage approaches:
Drainage Method | Winter Performance | Maintenance Needs |
Proper slope with permeable base | Excellent frost resistance | Minimal annual care |
Flat surface with solid base | Frequent frost heave damage | Regular repairs needed |
Inadequate slope | Water pooling and ice formation | Constant joint repairs |
Frost heave occurs when trapped water freezes and expands beneath your driveway. This lifts pavers unevenly, creating bumps and cracks. Toronto’s freeze-thaw cycles repeat this damage throughout winter, exponentially worsening the problem.
Preventing frost heave:
Maintain minimum 1-2% slope in all directions away from structures.
Use open-graded base materials that drain quickly.
Install edge restraints to prevent lateral paver movement.
Ensure joints remain filled with polymeric sand to block water entry.
Consider integrating professional drainage solutions in Etobicoke if your property has challenging grades or clay soils. French drains or catch basins can redirect water before it reaches your driveway. Proper drainage design extends your driveway’s lifespan by decades.
Common mistakes and troubleshooting
Even careful homeowners make errors that compromise durability. Understanding common mistakes helps you avoid costly repairs. The most frequent error is insufficient base depth and compaction. Homeowners often excavate only 6 inches, leaving the base vulnerable to frost penetration. Skimping on compaction allows settling that creates dips where water pools.
Poor drainage design results in water pooling and frost heave damage. Installing a flat driveway without slope seems easier initially but guarantees problems. Water has nowhere to go, seeping into the base and freezing.
Typical installation errors:
Using only 4 inches of base instead of the required 6 inches.
Skipping geotextile fabric, allowing weed growth and base mixing.
Applying regular sand instead of polymeric sand in joints.
Inadequate compaction, leaving air pockets that cause settling.
Ignoring edge restraints, allowing pavers to shift outward over time.
Uneven bedding sand creates bumps and loose pavers that compromise stability. If your screed work is rushed, high and low spots transfer to the finished surface. Walk across your bedding sand before laying pavers. Any footprints deeper than half an inch indicate insufficient base compaction beneath.
Using regular sand instead of polymeric sand invites weed intrusion and joint degradation. Regular sand washes away within months, creating gaps where pavers shift. Weeds establish quickly, forcing pavers apart and accelerating deterioration.
Pro Tip: Inspect your driveway twice yearly for early warning signs. Look for settling, joint sand loss, or water pooling. Addressing base or drainage issues early prevents major repairs. Refill joints promptly and adjust slope if needed. Small interventions extend lifespan dramatically when caught early.
Expected results, maintenance, and costs
Properly constructed interlocking driveways exceed 25 years of service with appropriate maintenance. Your investment pays returns through enhanced curb appeal, increased property value, and avoided replacement costs. Durability depends on following the construction standards outlined here.
Maintenance preserves your driveway’s appearance and structural integrity:
Sweep regularly to remove debris that can stain pavers.
Inspect joints seasonally, refilling polymeric sand as needed.
Seal the surface every 3-5 years to protect from weather and fading.
Remove snow carefully using plastic shovels to avoid scratching pavers.
Address stains promptly with appropriate cleaners.
Cost planning helps you budget realistically. Materials and labour typically range CAD $30-$60 per square foot depending on paver quality and design complexity. Premium pavers with intricate patterns cost more but deliver superior aesthetics and durability.
Cost Component | DIY Estimate | Professional Estimate |
Materials (pavers, base, sand) | $15-25/sq ft | $15-25/sq ft |
Equipment rental | $200-400 total | Included |
Labour | Your time | $15-35/sq ft |
Total per square foot | $15-25 | $30-60 |
Professional installation usually adds value by reducing errors and improving durability. Contractors bring experience in handling Toronto’s climate challenges and access to commercial-grade equipment. Warranties on professional work protect your investment against defects.
Consider professional help for [interlocking contractor services in Etobicoke](https://interlockingetobicoke.ca/interlocking installations) if your project exceeds 500 square feet or involves complex grading. The cost difference often balances against rental equipment, your time, and risk of mistakes requiring repairs.
Regular [paver maintenance](https://interlockingetobicoke.ca/post/paver maintenance explained 25 year lifespan weed control) extends lifespan and preserves appearance. Simple seasonal tasks prevent small issues from becoming expensive problems. Your driveway represents a significant investment deserving ongoing care.
Premium interlocking driveway services in Toronto
Achieving a durable, attractive driveway without hassle often requires professional expertise. Specialist services offer installations tailored to Toronto’s freeze-thaw cycles and your property’s unique characteristics. Experienced contractors understand how proper base preparation, drainage design, and material selection work together to create driveways lasting decades.
Expert drainage solutions complement driveway construction for maximum frost prevention. Integrating French drains or catch basins during installation prevents water damage before it starts. Professional teams coordinate these elements seamlessly, avoiding the coordination headaches of managing multiple contractors.
Combining retaining walls with driveway projects enhances both functionality and outdoor appeal. Proper grading and terracing solve challenging slopes while creating defined spaces. This integrated approach delivers cohesive outdoor transformations rather than piecemeal improvements.
Choosing premium interlocking installation services helps avoid costly mistakes that compromise durability. Professional work includes warranty backing, giving you peace of mind. The investment in expertise pays returns through superior results and eliminated do-over costs.
How deep should I excavate before installing an interlocking driveway in Toronto?
Excavate [8 to 12 inches below the finished surface](https://interlockingetobicoke.ca/post/interlocking driveway installation guide homeowners) to reach below Toronto’s frost line. This depth accommodates a 4-6 inch compacted gravel base, 1 inch bedding sand, and the paver thickness. Proper excavation depth prevents frost heave and shifting during freeze-thaw cycles that occur throughout Toronto winters. Shallow bases fail within years, requiring complete reconstruction.
Why is polymeric sand better than regular sand for driveway joints?
Polymeric sand hardens after wetting, locking paver joints tightly and preventing erosion during rain or snow melt. It reduces weed growth and insect infestation while enhancing joint durability by approximately 30% compared to regular sand. Regular sand washes out within months, creating gaps where pavers shift and weeds establish.
How do I maintain my interlocking driveway to ensure it lasts 25+ years?
Regularly sweep to remove debris that causes staining and prevents proper drainage. Inspect joints seasonally and [refill polymeric sand](https://interlockingetobicoke.ca/post/paver maintenance explained 25 year lifespan weed control) as it settles to maintain interlock integrity. Seal the surface every 3-5 years to protect pavers from weather damage, UV fading, and staining. Address any settling or drainage issues immediately before they worsen.
What slope should my driveway have for proper drainage?
Maintain a minimum 1-2% slope in all directions away from your home and garage. This grade ensures water flows off the surface rather than pooling in joints where it can freeze and cause damage. Even slight pooling accelerates frost heave and paver deterioration. Proper slope is essential for Toronto’s wet spring and freeze-thaw winter conditions.
Recommended
Comments